March 22, 2024
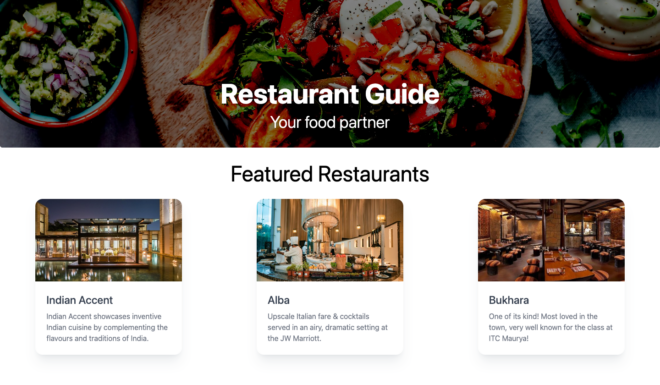
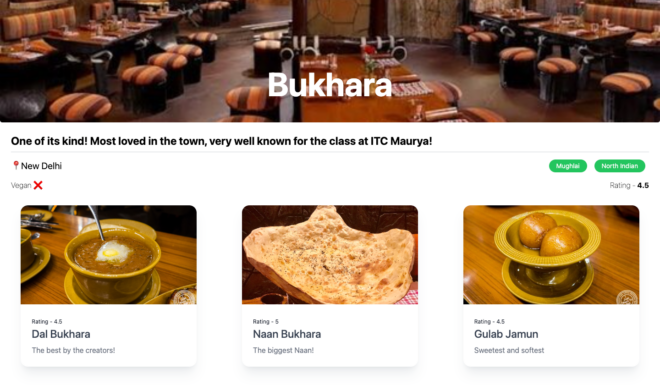
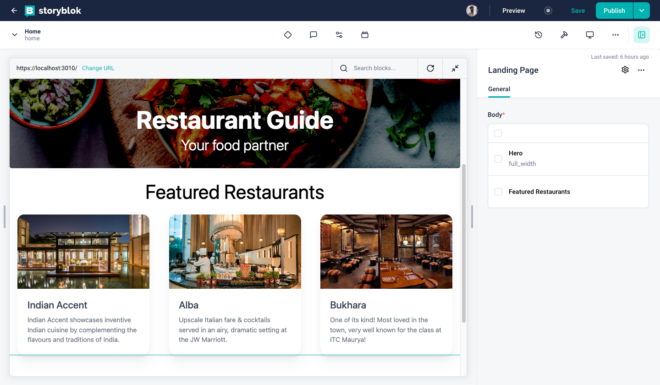
In this tutorial, we will explore how to integrate Next.js with Storyblok along with learning some Next.js and Headless features. We will also see how Storyblok works and enable the live preview of the Storyblok’s Visual Editor. To make things interesting, we will build a Restaurant Guide with the same. Here is a look of what we will be building –
Hint - If you're in a hurry, you can check out the repo at Github. You can also clone the space by clicking here. Requirements
To follow this tutorial there are the following requirements:
- Basic understanding of JavaScript, React and Next.js
- Node.js LTS version
- An account in the Storyblok App
Creating a Next.js Project
Let’s first create a Next.js project by the following command –
npx create-next-app@latestFeel free to choose your preferences and make sure to add TailwindCSS to the project as the code of this tutorial contains tailwind for styling. Let’s also install the Storyblok React SDK with the following command –
npm i @storyblok/reactThe SDK will allow us to interact with the API and enable live editing for us. Let’s now start the development server –
npm run dev
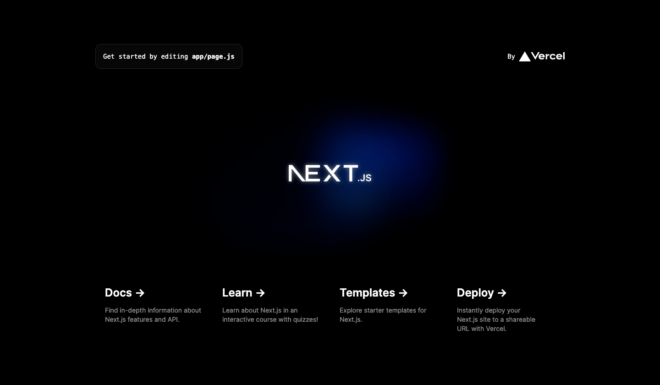
Once the server is started, open your browser at http://localhost:3000. You should see the following screen –
Due the securty reasons, http is not supported inside the Visual Editor of Storyblok, so we need to set up a proxy from an https port to http 3000. You can read more about it in setting up a proxy guide. We will be using 3010 port on https.
Hint - Checkout Storyblok’s Kickstart page to see in detail how to connect Storyblok with any technology, both in a new and existing projects.
Creating a Space in Storyblok
Now, let’s login into the Storyblok App. Once logged in, you will see a list of your spaces. Every card is a space here.

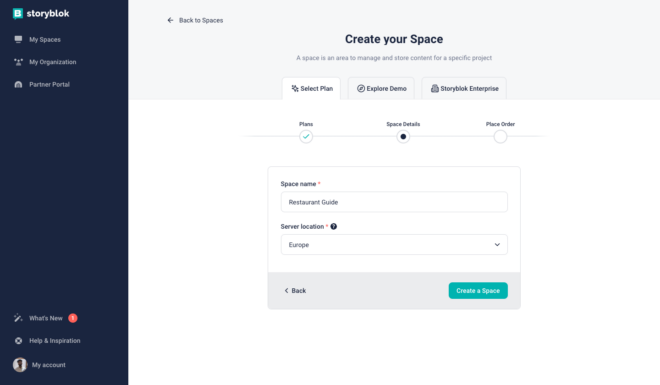
You can consider a space as a content repository, that contains everything like content, users, components, etc. For this tutorial, let’s consider one space as one project. You can read more about spaces in the Structure of Content guide present in the Storyblok website. Let’s now create a new space for our Next.js project by clicking the button present at the right top that says Add Space. Let’s choose creating a New Space from the list of options. There are a couple of plans available to choose from when you create a space. For this tutorial, feel free to choose the Community Plan which is free and requires no payment information.
Then, we can enter the Space name and Server location.
Setting up the Space
Once the space is created, you will see that there is a Home Story created inside the Content section and a couple of blocks (or components) in the Block Library section. We will be creating more stories and blocks according to our requirements of the app. As Storyblok is a headless CMS, you can create stories that are built of different blocks and consume the content inside the stories with the help of APIs on any frontend layer (in this case Next.js)
Hint - You can read more about a Story in the Structure of Content guide, it is basically an entry.
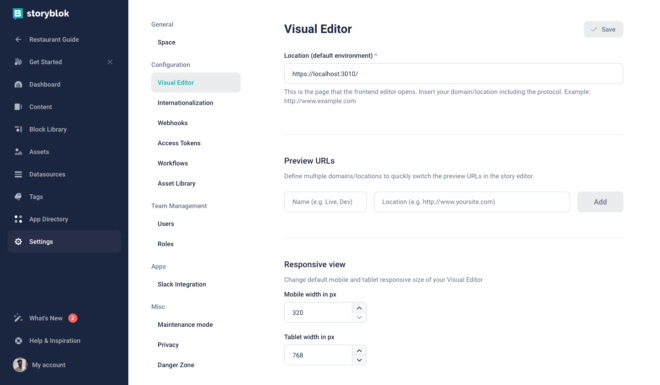
Let’s go to the settings of the space, and then Visual Editor tab. This is the place where you set up the location of the Visual Editor. Let’s change it to https://localhost:3010/ as this is our dev server after the proxy.
Now let’s go to the home story present inside the Content section, you will see that now we have a our Next.js website there. Though there is a 404, but the aim was to setup the Visual Editor Environment.

Integrating Next.js and Storyblok
Now, let’s add some code to our Next.js project to have the integration with Storyblok working and adding the functionality of live editing. Let’s first delete the page.js file inside the app folder. Then let’s create a [[..slug]] folder and a page.js file inside that. We are doing this to catch all the dynamic routes possible. You can read more about Dynamic Routes in official Next.js docs.
We will add the code to render every route inside this page.js file, let’s first initialize Storyblok. To do so, we need to go to the layout.js file and add storyblokInit function to it. You can add the following –
import { storyblokInit, apiPlugin} from "@storyblok/react/rsc"
// Existing Code
storyblokInit({
accessToken: 'your-access-token',
use: [apiPlugin]
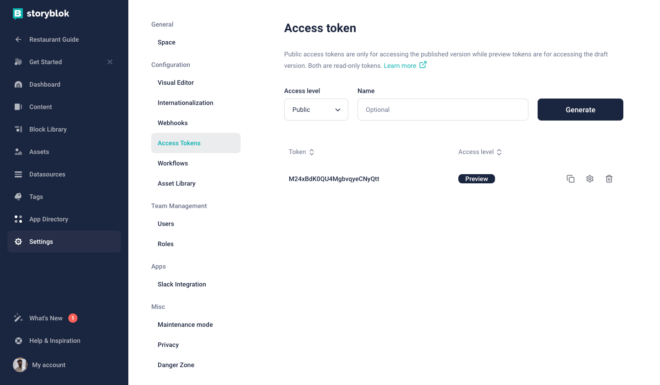
})We are importing storyblokInit and apiPlugin from the package, and are initializing the function. You can find the access token of your space inside the settings of the space. Make sure to copy the preview one. You can create more tokens according to the requirements.
apiPlugin helps us to use the functionality of Storyblok JS Client that allows us to interact with the Storyblok API using the SDK. If you don’t want to add it, you can choose your preferred way to fetch the content by making a get request to the Storyblok’s Content Delivery API.
Once this is done, we also need to add a special wrapper component that will allows us to do the edits in real time. As Next.js by default is doing everything on the Server Side with React Server Components, it is not possible to play around with Javascript and listen to such events. Hence, this component will be a Client Side Component.
Create a components folder and then create a new file named StoryblokProvider.js in the components folder. You can paste the following code in that –
/** 1. Tag it as client component */
"use client";
import { storyblokInit, apiPlugin } from "@storyblok/react/rsc";

/** 2. Import your components */
// import Page from "./Page"

/** 3. Initialize it as usual */
storyblokInit({
  accessToken: "your-access-token",
  use: [apiPlugin],
  components: {},
});

export default function StoryblokProvider({ children }) {
  return children;
}
Here we do the initalization again on the client side, the previous initialization in the layout will be used to fetch the data. Here, we also have a components key inside the initialization, which will contain all the map of all the components we create for dynamic rendering.
We need to wrap the app inside this component. The layout.js file should now look like this –
import { storyblokInit, apiPlugin} from "@storyblok/react/rsc"
import StoryblokProvider from "@/components/StoryblokProvider"
import './globals.css';
export const metadata = {
  title: 'Storyblok and Next.js 14',
  description: 'A Next.js and Storyblok app using app router ',
}
storyblokInit({
  accessToken: 'your-access-token',
  use: [apiPlugin]
})
export default function RootLayout({ children }) {
  return (
    <StoryblokProvider>
      <html lang="en">
        <body>{children}</body>
      </html>
    </StoryblokProvider>
  )
}
Now let’s add the logic to the page.js file to render all the routes. Paste the following code inside the file –
import { getStoryblokApi } from "@storyblok/react/rsc";
import StoryblokStory from "@storyblok/react/story";

export default async function Page({ params }) {
  let slug = params.slug ? params.slug.join("/") : "home";

  const storyblokApi = getStoryblokApi();
  let { data } = await storyblokApi.get(
    `cdn/stories/${slug}`,
    { version: "draft" },
    { cache: "no-store" }
  );

  return (
    <div className="mb-40">
      <StoryblokStory story={data.story} bridgeOptions={{}} />
    </div>
  );
}

export async function generateStaticParams() {

  const storyblokApi = getStoryblokApi();
  let { data } = await storyblokApi.get("cdn/links/", {
    version: "draft",
  });

  let paths = [];

  Object.keys(data.links).forEach((linkKey) => {
    if (data.links[linkKey].is_folder) {
      return;
    }
    const slug = data.links[linkKey].slug;
    if (slug == "home") {
      return;
    }
    let splittedSlug = slug.split("/");
    paths.push({ slug: splittedSlug });
  });
  return paths;
}
In this file, we import getStoryblokApi that is used to fetch the data from Storyblok. First thing to see here is the generateStaticParams function here provided by Next.js. This function is used to define the dynamic routes that should statically generate during build time. This is pretty useful for static generation. You can read more about the function in the Next.js Docs.
In this function, we fetch all the links that are inside Storyblok. This means we get all the entries. We are using the links endpoint of the API which gives us the access to all the links so we don’t have to fetch the complete stories. You can take a look at the links endpoing in the API reference. We are ignoring the home slug here, as it will be used for all the other routes along with it.
Once we have all the links we return the paths array as required by generateStaticParams function in the required format. Once we have all the links, the Page function can handle the logic for rendering it. Inside the Page function, we first retrieve the slug and fetch the content of that slug using the API. With the fetch, the first parameter is the slug, second one is the API Options where we define the version in this case (there are more options that can be passed), and the third parameter is to pass custom fetch options.
Storyblok stores two versions of content, one is draft and the other is published. By default, when you create something or make changes, the new content is stored as draft until you hit publish.
Hint - Only Preview token can fetch the draft as well as the published version of content. Public token can only fetch the published version.We also pass the third parameter as { cache: "no-store" } for Next.js, so that the request is not cached all the time when the content changes.
After we get the data, we use the StoryblokStory component to render the components received in the content dynamically. We also need to pass the story property which will contain the content of the component. The other property is the bridgeOptions, which takes the options for the bridge.
Now with this all done, we are ready to create the new stories and components!
Creating Stories and Components
Let’s start by creating a Restaurant component first. This will help us understand the basics, and then we can add multiple fields as well as components. Go to the Block Library in Storyblok, you will see that there are already a few blocks created. We won’t be using these, so let’s create a new one by clicking the button on right top that says Create New . Let’s add the name restaurant for this, and choose Content type block.
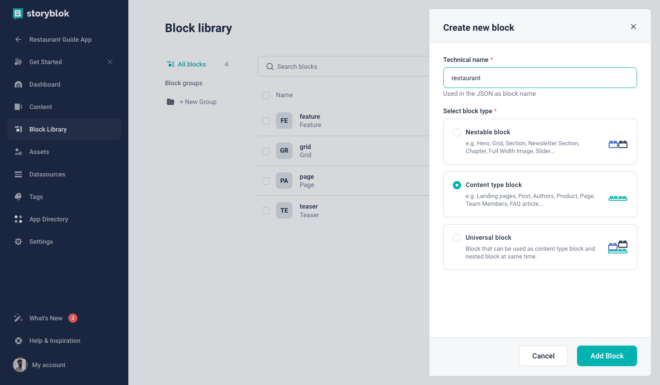
There are 3 different types of components in Storyblok, Content type blocks are the ones that can be standalone stories. The Nestable ones are the ones that can be added in other blocks. And, Universal blocks can be used as both.
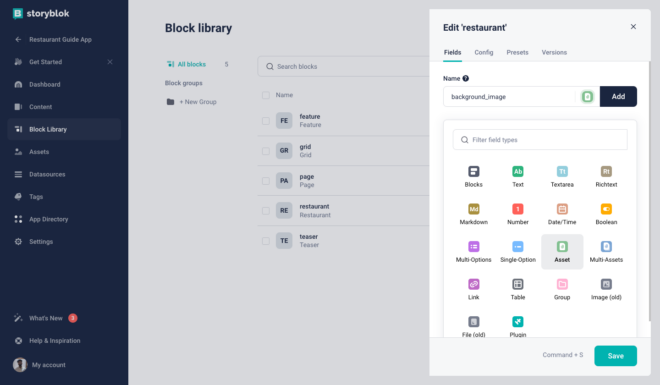
Now once the component is added, we need to add a couple of fields to it. Let’s start by adding a name field and a background image field. The pre selected field type is text, but you can change it while creating the field or after the field is created. For the background_image, select (or change to) the type asset.
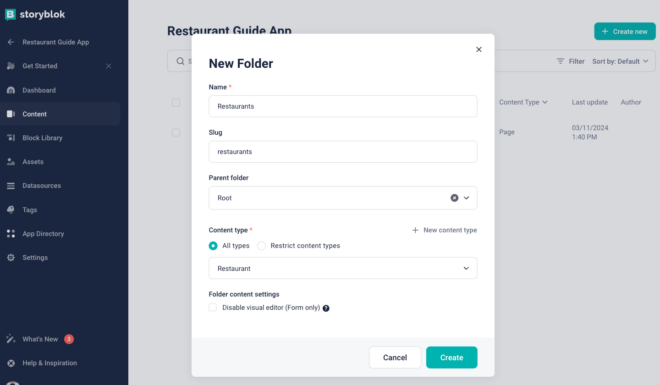
Once the component is created, we can use this to create new Restaurant stories to store the content related to a restaurant. Let’s go the Content section, and add a new folder named Restaurants. This folder will store all the restaurants. Select the default content type as Restaurant.
Once the folder is created, add a new story inside it for a restaurant. Feel free to choose the name of the restaurant.

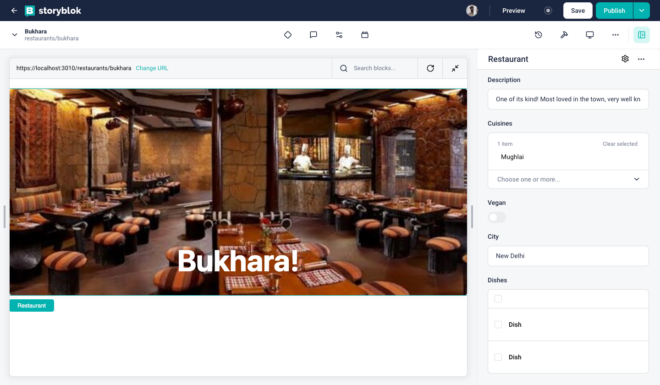
Once the story is created, you will see the fields that we added in our component.
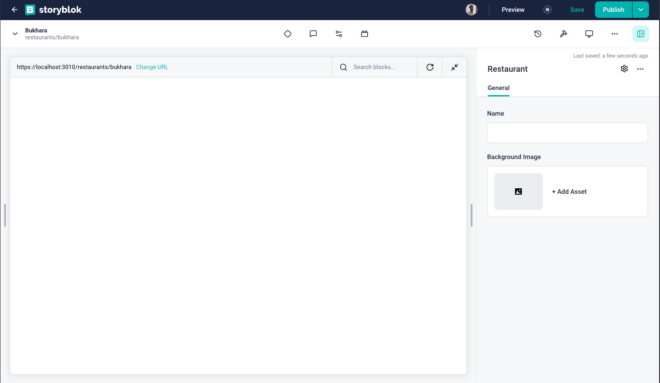
The fields are empty, as well as our frontend is not showing anything at this moment. Add the content to the fields and then let’s hit the save button on the right top. Even when we hit save, nothing is shown in the Visual Editor. This is because we are missing one important step – creation of component on the frontend. You should also see a warning in the terminal saying that the component doesn’t exist.
Let’s now create a Restaurant component in our Next.js project. Create a new file name Restaurant.js inside the components folder and paste the following code –
import { storyblokEditable } from "@storyblok/react/rsc";

const Restaurant = ({ blok }) => (
  <main {...storyblokEditable(blok)}>
    <div>
      <div
        className={`min-h-[500px] relative
          flex
          items-end
          justify-center
          p-9
          my-6
          rounded-[5px]
          overflow-hidden`}
      >
        <div className="relative z-10 text-center">
          <h1 className="text-7xl text-white font-bold mb-3">{blok.name}</h1>
        </div>
        <img
          src={`${blok.background_image?.filename}`}
          alt={blok.background_image.alt}
          className="absolute top-0 left-0 z-0 w-full h-full object-cover"
        />
      </div>
    </div>
  </main>
);
export default Restaurant;
In this component, we are getting a property named blok that we passed from the StoryblokStory as the story property. This blok property will contain all the information coming from the story. In this case, it will have the name we added along with the background_image. We can directly access those properties from the blok object. For the name, it is blok.name and for the image it is blok.background_image?.filename. This is because asset field gives you another object which contains other information along with image’s url under the property name filename.
The components where live editing is required must have the StoryblokEditable function on the root element as we have it here on the main tag. This allows us to see the dotted lines inside the visual editor and makes the components clickable.
Once we save this component, we also need to add this to the initalization in the StoryblokProvider.js file –
/** 1. Tag it as client component */
"use client";
import { storyblokInit, apiPlugin } from "@storyblok/react/rsc";

/** 2. Import your components */
import Restaurant from "./Restaurant";

/** 3. Initialize it as usual */
storyblokInit({
  accessToken: "your-access-token",
  use: [apiPlugin],
  components: {
    'restaurant': Restaurant
  },
});
export default function StoryblokProvider({ children }) {
  return children;
}
As soon as we save this, we should see the preview in the Visual Editor! Now, if you try to change the text or the image, you will even see a live preview in real time. Congratulations, we now have everything working for us. Now it is all about creating new fields and new components.
Let’s now add the following fields (along with the types) to the Restaurant block –
description– Textareacuisines– Multi-Optionsvegan– Booleancity– Textdishes– Blocks
You can add more fields of your choice, once the fields are added we just need to map those in the frontend to be used by our Restaurant component.
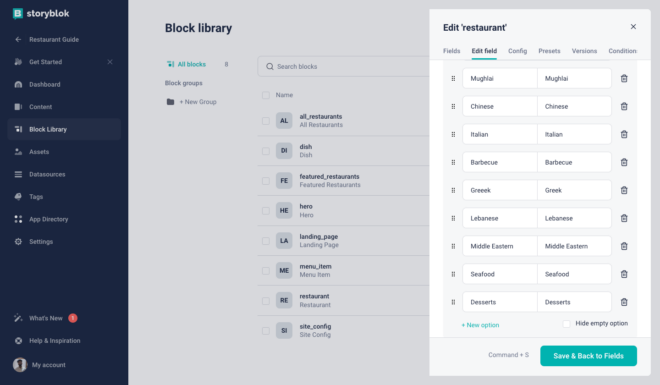
For the cuisines field that we added, you can add options of your choice.
The dishes field that we added is of type blocks. Blocks is a special type that allows other nestable components to be inserted inside it. As it is recommened to be as granular as possible, we can make another component named dish that can be added inside that field.
Let’s add a new nestable block named dish with the following fields –
name– Textdescription– Textareaimage– Asset
Let’s now go to the newly added restaurant and fill the other fields along with adding a dish block there.
Now to make all these fields visible, we need to add those in our Restaurant component in Next.js and we also need to add a Dish component in our frontned. Paste the following code in a new file named Dish.js under the components folder –
import { storyblokEditable } from "@storyblok/react/rsc";
const Dish = ({ dish }) => {
  return (
    <section {...storyblokEditable(dish)}>
      <div className="mx-auto flex w-80 flex-col justify-center bg-white rounded-2xl shadow-xl shadow-gray-400/20">
        <img
          className="aspect-video w-80 rounded-t-2xl object-cover object-center"
          src={dish.image.filename}
        />
        <div className="p-6">
          {/* <small className="text-gray-900 text-xs">
            Rating - {dish.rating.value}
          </small> */}
          <h1 className="text-2xl font-medium text-gray-700 pb-2">
            {dish.name}
          </h1>
          <p className="text text-gray-500 leading-6">{dish.description}</p>
        </div>
      </div>
    </section>
  );
};
export default Dish;
Make sure to add this to the storyblokInit function as we added the Restaurant component. Paste the following code in the Restuarant.js file –
import { storyblokEditable } from "@storyblok/react/rsc";
import Dish from "./Dish";
const Restaurant = ({ blok }) => (
<main {...storyblokEditable(blok)}>
<div>
<div
className={`min-h-[500px]
relative
flex
items-end
justify-center
p-9
my-6
rounded-[5px]
overflow-hidden`}
>
<div className="relative z-10 text-center">
<h1 className="text-7xl text-white font-bold mb-3">{blok.name}</h1>
</div>
<img
src={`${blok.background_image?.filename}`}
alt={blok.background_image.alt}
className="absolute top-0 left-0 z-0 w-full h-full object-cover"
/>
</div>
<div className="px-6">
<h2 className="text-2xl font-bold ">{blok.description}</h2>
<hr className="flex-grow border-t mt-2 border-gray-300"/>
<div className="flex justify-between mt-4">
<p className="text-xl">📍{blok.city}</p>
<div className="flex ">
{blok.cuisines.map((c) => (
<span
key={c}
className="px-4 py-1 rounded-full mx-2 text-white text-sm bg-green-500 "
>
{c}
</span>
))}
</div>
</div>
<div className="flex justify-between gap-4 mt-4">
<p className="font-thin">Vegan {blok.vegan ? "✅" : "❌"}</p>
{/* <p className="font-thin">
Rating - <span className="font-bold">{blok.rating.value}</span>
</p> */}
</div>
</div>
<div className="mt-8 grid w-full grid-cols-1 gap-2 mx-auto sm:grid-cols-3">
{blok.dishes.map((d) => (
<div className=" ">
<Dish dish={d}></Dish>
</div>
))}
</div>
</div>
</main>
);
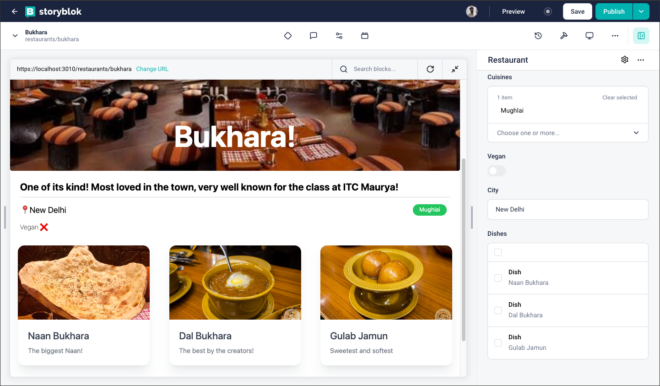
export default Restaurant;Once this is done, we should be able to see the other fields rendered as well. The best part here is that, whenever you change anything like adding or deleting a new dish, changing the images or text – everything is visible in real time. Feel free to try dragging the components as well to see the power of Visual Editor.
At this point, we have covered all important things and we are ready with our fully functional website. Just to make it better, let’s add a few more restaurants in the folder.
To make our website look good, let’s also make the landing page better as well. Delete the home story that we have, and then go the block library to make some changes and add new blocks. You can go ahead and delete the page block as well. Let’s create the following components now –
landing_pagebody– Blocks
heroheadline– Textsubheadline– Textimage– Assetlayout– Single-Option with two options ( constrained and full_width)
featured_restaurantsrestaurants– Multi Option
In the restaurant field of featured_restaurants block, change the source to Stories and add the path folder as well as the content type as shown below –
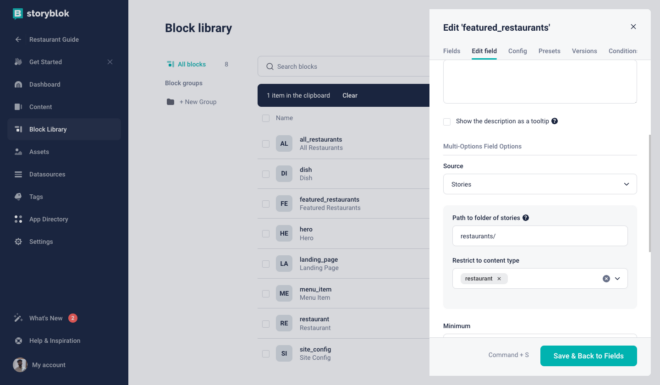
This will allow us to select the restaurants in the block from the Restaurants folder.
Now let’s add the following components to our Next.js project –
LandingPage.js –
import { storyblokEditable, StoryblokComponent } from "@storyblok/react/rsc";

const LandingPage = ({ blok, restaurants }) => (
  <main {...storyblokEditable(blok)}>
    {blok.body.map((nestedBlok) => (
      <StoryblokComponent restaurants={restaurants} blok={nestedBlok} key={nestedBlok._uid} />
    ))}
  </main>
);

export default LandingPage;
The StoryblokComponent here allows us the render the components dynamically and is also used behind the scenes while using the StoryblokStory component.
Hero.js –
import { storyblokEditable } from "@storyblok/react/rsc";
const Hero = ({ blok }) => {
  return (
    <div {...storyblokEditable(blok)} className={`min-h-[500px]
    relative
    flex
    items-end
    justify-center
    p-9
    my-6
    rounded-[5px]
    overflow-hidden ${blok.layout === 'constrained' ? 'container mx-auto' : ''}`}>
      <div className="relative z-10 text-center">
        <h1 className="text-6xl text-white font-bold mb-3">{blok.headline}</h1>
        <h2 className="text-4xl text-white font-light">{blok.subheadline}</h2>
      </div>
      <img
        src={`${blok.image?.filename}/m/filters:brightness(-50)`}
        alt={blok.image.alt}
        className="absolute top-0 left-0 z-0 w-full h-full object-cover"
      />
    </div>
  );
};
export default Hero;
FeaturedRestaurants –
import { storyblokEditable } from "@storyblok/react/rsc";
const FeaturedRestaurants = ({ blok }) => {
  return (
    <section {...storyblokEditable(blok)}>
      <p className="text-5xl mt-8 text-center">Featured Restaurants</p>
      <div className="mt-8 grid w-full grid-cols-1 gap-2 mx-auto sm:grid-cols-3">
      {blok.restaurants.map((r) => (
          <div key={r.slug}>
            <div className="mx-auto flex w-80 flex-col justify-center bg-white rounded-2xl shadow-xl shadow-gray-400/20">
              <img
                className="aspect-video w-80 rounded-t-2xl object-cover object-center"
                src={r.content.background_image?.filename}
              />
              <div className="p-6">
                <small className="text-gray-900 text-xs">
                  {/* Rating - {reestaurant.rating.value} */}
                </small>
                <h1 className="text-2xl font-medium text-gray-700 pb-2">
                  {r.content.name}
                </h1>
                <p className="text text-gray-500 leading-6">{r.content.description}</p>
              </div>
            </div>
          </div>
      ))}
      </div>

    </section>
  );
};
export default FeaturedRestaurants;
The final version of StoryblokProvider.js with all the components should like this –
/** 1. Tag it as client component */
"use client";
import { storyblokInit, apiPlugin } from "@storyblok/react/rsc";
/** 2. Import your components */
import FeaturedRestaurants from "./FeaturedRestaurants";
import LandingPage from "./LandingPage";
import Hero from "./Hero";
import Restaurant from "./Restaurant";
/** 3. Initialize it as usual */
storyblokInit({
accessToken: "your-access-token",
use: [apiPlugin],
components: {
restaurant: Restaurant,
hero : Hero,
"landing_page": LandingPage,
"featured_restaurants": FeaturedRestaurants,
},
});
export default function StoryblokProvider({ children }) {
return children;
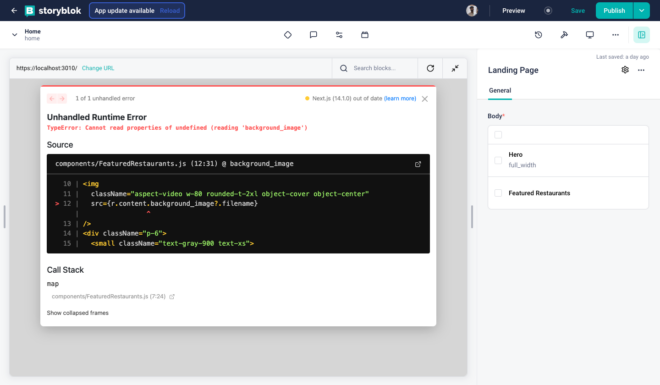
}Now let’s go ahead and create a new home story using the landing page block. Add two blocks, the hero and featured_restaurants to its body field. Let’s also add data to these fields along with selecting the restaurants in the Featured Restaurants field. You will see that we get an error here, this is because the restaurants we select aren’t stored as the complete stories but as references. If you try checking the API response, you will see there are just a few UUIDs under the field.
We need to resolve this field to get the data for the restaurants inside the component. For this case, there is a parameter that we can pass named as resolve_relations. We also need to resolve the relations for the bridge.
Resolving Relations(for referencing one story in another story)
In the Page.js file where we fetch the data, we need to add the parameter as mentioned below –
let { data } = await storyblokApi.get(`cdn/stories/${slug}`, {version: 'draft', resolve_relations: ["featured_restaurants.restaurants"]}, {cache: "no-store"});Also, as mentioned earlier, there is an option for passing the bridge options in the StoryblokStory. To pass that please change the component tag to the following in the same file –
<StoryblokStory story={data.story} bridgeOptions={{resolveRelations: ["featured_restaurants.restaurants"]}} />And that is all! The error should be gone now. The preview will display the content rendered the way it should be along with the enabled live editing. We can now make any number of changes, add different blocks and it will all be editable in real time.
Similarly, there can be more new blocks (components) and fields created. This was just a basic app to show the capabilities of Next.js and Headless. There are endless possibilities. Make sure to check out the space mentioned in the hint at the top along with the repository for a few more ideas. You can even try creating a demo space that is available while creating a new space.
Conclusion
In this tutorial, we saw how to integrate Next.js and Storyblok. We saw how to manage and consume content using the API, and how to enable a real-time visual experience using the Visual Editor. We also went through a couple of features that Next.js offers to create great user experiences.
Resources to look at –
| Resource | Link |
| Storyblok Technologies Hub | https://www.storyblok.com/technologies |
| Storyblok React SDK | https://github.com/storyblok/storyblok-react |
| Next.js Docs | https://nextjs.org/ |
| Storyblok Visual Editor | https://www.storyblok.com/docs/guide/essentials/visual-editor |
| Storyblok JS Bridge | https://www.storyblok.com/docs/Guides/storyblok-latest-js |
Recent Posts


August 27, 2025
How to Find the Right Learning Path When You’re Switching to a Tech Career
See post


August 27, 2025
The Hidden Challenges in Software Development Projects: Key Insights from Our Latest Survey
See post


August 22, 2025
Developer News This Week: AI Speed Trap, GitHub Copilot Agents, iOS 26 Beta Updates & More (Aug 22, 2025)
See post